About Me

My photo
Hello, I'm a technology geek looking to upgrade my programming skills. These are some of the things I'm learning along my journey.

Monday, December 31, 2012

Create Remote Links


In this post I will explain a technique for creating remote links on your web page. It's easy using jQuery to create these effects.

Finished Look


Click ((here)) for a demo of the finished remote link page.

First Step:
Create containers for the links and images to be manipulated with jQuery.
Example:

Second Step:
Arrange the container using CSS. Add the "overflow: hidden" property in this slide-show effect to keep the other images from showing.
Example:

Third Step:
Create a jQuery script to slide the divs containing the images up in the stacking order.
Example:


Click ((here)) for the project code.

Tuesday, December 25, 2012

Modify Dropdown Navigation (Part 2)

This post is the second part on modifying a sample dropdown navigation bar. I will discuss the changes to the CSS file that will complete this modification. In this tutorial, the colors will be converted from a green to a blue hue of similar intensity. This will require modifying the hue and not the saturation or brightness (HSB).

Step 1:
Download the sample navigation ((here)). Once you unzip the files, open the "pro_dropdown_2.css" file in an editor. Locate all the ".gif" files and rename the file names from the existing file name to the file names you chose from the previous post.

Example:
three_0.gif to blue_0.gif

Copy the new ".gif" files you created to the website folder.

Step 2:
Change all the green hue colors to blue hue colors. This can be done by locating the existing green colors that start with a "#" character. Once you find the hex color code, change it to a similar blue hue. This can be done by loading Photoshop and opening up a new blank image. In the toolbox, click the foreground or background color selection box. This will bring up the "Color Picker". Type in the first hex color code you find in the "pro_dropdown_2.css" file.

Example:
background: #bbd37e


Change this hue to an equivalent blue hue by changing the "H:" value. This can be done by adding 120 to 77 which is 197. Enter 197 in the "H:" box.


Copy the new hex value which is #7fbcd4 and replace this with the original value in the CSS file. Repeat this process for all the green color hues in the file.

Click ((here)) for a demo of the finished navigation bar.


Modify Dropdown Navigation (Part 1)

Sometimes you come across examples with its own graphics and you want to modify it to suit your needs. I have separated this tutorial into the graphical and the code modifications.

The first part will go into the recreation of the graphics so that you can adjust it to your needs. The code and graphics from Professional Dropdown #2 will be used for this exercise. I will show how to simulate the effect of these images in Photoshop and change the colors in the graphics from the existing shade of green to the same shade of in blue.

The existing graphics for this example are:

three_0.gif
three_0a.gif
three_1.gif

three_1a.gif

The second graphic on the list is "three_0a.gif" which is a basic glossy button with a small white triangle. The size is 300px wide by 35px high. The graphic "three_0.gif" is a slice of  "three_0a.gif" and can be created in the same artwork. The same for "three_1.gif" and "three_1a.gif".

Step 1:
Create an new file in Photoshop with the dimensions of 600px wide by 70px high which is double the size of the original graphic. It's easier to start with a large file to fill up the screen
and reduce the size later to the required dimensions.


Step 2:
Set the foreground color by clicking on the color swatch and choosing a blue "#0000ff" in the "Color Picker". With the top layer highlighted, click "Edit", "Fill...",  choose "Foreground Color" and click "OK".


Step 3:
Switch the the foreground color by pressing the "x" key and click on the foreground color to bring up the "Color Picker". Choose a white color "#ffffff and click "OK". Create a gradient overlay on top of the layer by clicking "Layer", "Layer Style", "Gradient Overlay...". With the "Gradient Overlay" selection of the "Layer Style" selected, click on the gradient dropdown menu. This will bring up the "Gradient Editor" Adjust the gradient to your liking and click "OK". To get a more detailed tutorial on creating a gradient with the editor, ((click here)).


Step 4:
Add an arrow to the image by clicking on "Layer", "New", "Layer". Right click on the layer and select "Layer Properties". In the name box type "arrow" and click "OK". Click and hold the "Rectangle Tool" (U) and select the "Polygon Tool". Type "3" in the "Sides" box at the top. Set the foreground color to white or a color that will stand out. While holding down the shift key, draw a triangle at the top of the image. Choose the "Move Tool" (V) and position it to the desired location.


Step 5:
Resize the image by clicking on "Image", "Image Size...". Type 300 pixels for the width and 35 pixels for the height and click "OK". Click on "File" and then "Save for Web...". Choose "GIF 128 no Dither", check "Transparency" and click "Save". Choose the name "blue_0a.gif" and the folder where the original graphics are located.

Step 6:
Crop and small slice of the image to create the "blue_0.gif" by selecting the "Crop Tool" (C) and dragging it over a small section of the image.  Click on "File" and then "Save for Web...". Choose "GIF 128 no Dither", check "Transparency" and click "Save". Choose the name "blue_0.gif" and the folder where the original graphics are located.

Step 7:
Reverse the previous crop in step 6 to bring the image back to it's original dimensions by pressing CTL-Z or stepping back one step in the "History" tab. Highlight the "Layer 1" layer. Click on "Image", "Adjustments" and "Brightness/Contrast...". Increase the contrast to 30 and click "OK".


Step 8:
Highlight the "Layer 1" layer. Click on "Layer", "Layer Style", "Bevel and Emboss...". Leave the settings on their defaults except Style: Inner Bevel, Direction: Down, Size: 3px.


Step 9:
Click on "File" and then "Save for Web...". Choose "GIF 128 no Dither", check "Transparency" and click "Save". Choose the name "blue_1a.gif" and the folder where the original graphics are located.
Turn off the "arrow" layer visibility and click on "File" and then "Save for Web...". Choose "GIF 128 no Dither", check "Transparency" and click "Save". Choose the name "blue_1.gif" and the folder where the original graphics are located.


Saturday, December 22, 2012

Push Button Tutorial for Your Website

This comprehensive tutorial will give you the information you need to create a push-button graphic effect for your website.You will need Photoshop 6 or higher and a HTML editor such as Visual Web Developer Express.

Demo - Click on image:


Photoshop tutorial.

Open an 800px x 600px new image with white background on the base layer.

Double-click base layer to unlock it.
Add a new transparent layer on top of base layer.


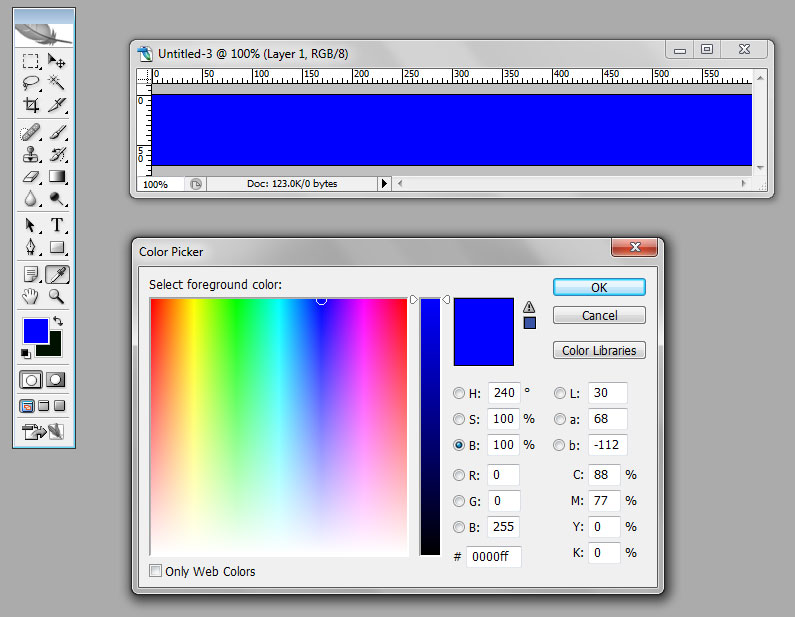
Choose a medium color for foreground.
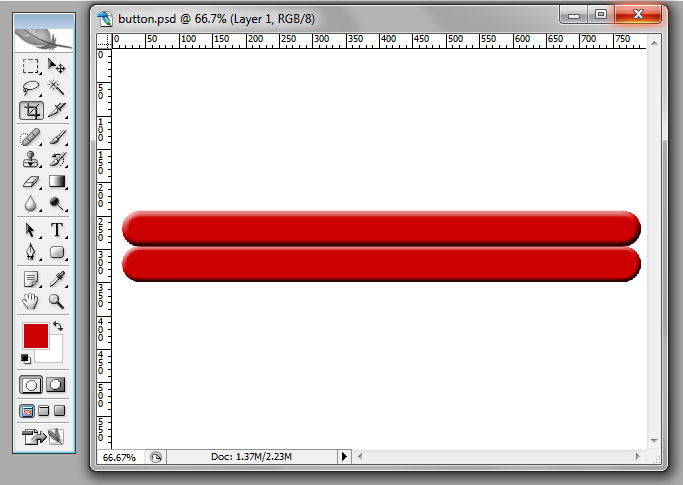
Draw a wide rectangle with a round rectangle tool (U).

 
Drag the layer of the rectangle to make a copy.


Select the "Move" tool (V) while the top rectangle layer is highlighted.

Move the rectangle with up the arrow key until the rectangle is above the lower rectangle and no white space is visible.


Select the upper rectangle layer:
  Select "Layer", "Layer Styles", "Bevel and Emboss"
  Style: Inner Bevel
  Technique: Smooth
  Depth: 100%
  Direction: Up
  Size: 10px
  Soften: 0px
  Angle: 120 degrees
  Global Light: checked
  Altitude: 30 degrees
  Gloss Contour: linear
  Anti-aliased: unchecked
  Hightlight Mode: Screen
  Opacity: 75%
  Shadow Mode: Multiply
  Color: Black
  Opacity: 75%

Select the lower rectangle layer:
  Everything the same as upper rectangle except - Size: 7px
Select "Color Overlay"
  Blend Mode: Difference
  Opacity: 10%


Drag the base layer to the trash can icon to create a transparent background.
Merge all layers.
Select "Layers", "Merge Visible" or Ctl-Shift-E.
Select "Image", "Trim...":
  Based on: "Transparent Pixels"
  Trim Away: "Top, Bottom, Left, Right" check boxes selected
Select "Image", "Image Size":
  Height: 96px
  Scale Styles: checked
  Constrain Proportions: checked
  Resample Image: Bicubic Sharper

 
Select "Crop Tool" (C).
Click from the outside of the upper left-hand corner of the cropped image and drag right and down to select a few pixel  left of the right-hand edge of image.


Select "File", "Save for Web...":
  Preset: PNG-24
  Interlaced: Unchecked
  Transparency: checked
  Click "Save" and choose image folder for web site.

Select "Window", "History" and select one step above the latest action.


Select "Crop Tool" (C).
Click from outside of the upper right-hand corner of the cropped image and drag left and down to select a few pixels of the right hand image.


Select "File", "Save for Web...":
  Preset: PNG-24
  Interlaced: Unchecked
  Transparency: checked
  Click "Save" and choose image folder for web site.


HTML/CSS tutorial.

Create a button on the HTML page.
Example:

Create a style sheet that will utilize a "Sliding Doors" effect. Click ((here)) for a good explanation of this effect.
Example:


Thee CSS code can be tweaked to suite different size buttons.

Click ((here)) for the project code.

Tuesday, December 11, 2012

Create a Custom Static Map

Have you ever wanted to include a customized Google map in you web page without much coding? Google's Static Map service service creates your map based on URL parameters sent through a standard HTTP request and returns the map as an image you can display on your web page.


The easiest way to include a map is to simply go to Google Maps and insert an address or coordinate in the search box. Once you have selected the location and style of map, click on "Customize and preview embedded map". Here you are offered some limited options to adjust your map. After you have selected your options, copy and paste the code into your web page. Some of the options can be adjusted after pasting.

A more customized map can be achieved with the Google Static Map Wizard. Follow the instructions and copy the code. Paste it into an "img" tag on your web page. Once pasted, change the "sensor=TRUE_OR_FALSE" to "sensor=false" so that the map will show up in you browser.

Example:

The URL in the pasted code can be further enhanced by adding parameters listed in the "Static Maps API V2 Developer Guide". Try out the "Quick Example" in your own code and make minor adjustments to see what happens.


Thursday, December 6, 2012

Create a Path in Google Earth

This post will cover creating a new path in Google Earth, saving it to file and creating a path or track. Lastly, I will explain how to work with an existing path or track.

First:
Open up Google Earth and enter a location in the Search box. If you are starting at a location with no street address, locate the starting point in Google Maps and right-click on the starting point. Selecting "What's here" should fill the coordinates in the search box. Copy the coordinates and paste them in the Google Earth search box. Click on the search button. Your location should now be visible on the screen.

Second:
Click on the "Add" menu and select "Path". The "New Path" dialog box with appear. Click on the "Style, Color" tab and Click in the box next to "Color:". Select a color that will show up well on your map. Click in the box next to "Width:" and select a thickness that will show up well. Now click on the map and start drawing a line. You can also click several times to create a series of straight lines. Make sure you DO NOT close the "New Path" dialog box before you finish drawing your path since this will end your new path drawing mode. Once you are done, click "OK" in the "New Path" dialog box. Your new path will appear in the "Places" side panel.


Third:
You can edit or rename your new path by right-clicking on the path in the "Places" side bar and selecting "Rename". You can also select "Save to My Places" to make it persist when the program is terminated. Editing the path is accomplished by right-clicking on the new path and selecting "Properties". This will bring up the "Edit Path" dialog box. Here you can change the setting of the path and the path direction and size. To change the path direction click on anyplace of the path while the "Edit Path" dialog box is open and drag that part of the path around. You can also delete part of a path by right-clicking on anyplace of the path. This will delete a point on the path.

You can also import an existing track in "KMZ" format. If you have a GPS device that has a recorded track, just download the file to your computer and then convert it to "KMZ" format with the GPS Visualizer Conversion utility. Once you have completed the conversion, download the converted file to your computer and double-click on it to bring up Google Earth. The existing track should be visible now.


Tracks can have their own topographic overlays. I have explained the procedure in my previous post called "Create a Map Overlay for Google Earth".


Create a Map Overlay for Google Earth

If you ever wanted to change the overlay on Google Earth to display a topographic map or other types of maps, the information is sparse and sometimes wrong. I found out how to do it by experimenting. Here is what I found.

My search ended up at GPS Visualizer. It has several free tools that are very useful. I will focus on one of them for this post. They have an overlay creator for Google Earth that seemed to be what I was looking for. The only problem was that there was no step-by-step instructions. After some trial and error, I eventually got it to do what I wanted.

First:
Download and install Google Earth.

Second:
Fill out the form at the GPS Visualizer Overlay page for Google Earth and enter a overlay center point in either the "Location" box or "Latitude/Longitude" boxes. I chose  the "Enter a Center Point" radio button and "Dynamic" in the dropdown menu. The "Size of overlay" was entered with 2000 and the "GE document name field was left blank. I left the Dimensions at "Square". Lastly, I chose the "US: USGS topo map (2m: 2000px)". Once you are done click on "Create Overlay". You will be taken to a new page saying "Your KML overlay parameters have been processed". Click on the link reading "Click here to download your overlay". The "KMZ" file will download to your computer.

Third:
Double-click on the downloaded "KMZ" file which should load Google Earth as "USGS topo map" in Temporary Places. You can make this map persist by right-clicking on the "USGS topo map" link which will bring up a menu. Select "Save to My Places".


Fourth:
Your map overlay should show up on the main screen.


There are quite a few different ways to create overlays depending on your needs. I will go into some of them on my next post.

Saturday, December 1, 2012

Creating popup navigation to the skeleton

This post expands on "Create a Responsive HTML/CSS Skeleton". I will explain one of the ways you can add popup navigation to your mobile site.

Popup navigation can add a lot of usability to you site when viewing it on smaller devices such as smart phones.  An example of this functionality can be viewed on the Starbucks website.

Navigation Hidden

Navigation Visible

 The idea is to include a button to toggle the visibility of the navigation on and off. I will include some jQuery animation to slowly grow and shrink the navigation box just like the Starbucks website does.

Fist you will need a button to display control the animation.

Example:


Second, create a container with an unordered list for the navigation content.

Example:


Third, style the CSS to hide the popup navigation container.

Example:


Fourth, create jQuery code to detect the HTML content of the button and grow or shrink the popup navigation container.

Example:


Click ((here)) for the project code.

Click ((here)) for demonstration of the code.  Make sure you size your browser below 1000px width to see this effect.

Friday, November 23, 2012

Adding Navigation to the Skeleton

This post expands on "Create a Responsive HTML/CSS Skeleton". I will explain some of the ways you can add horizontal navigation to your site.


The first step is to insert an unordered list to your page.

Example:


Next, CSS is used to create the drop-down effect.

Example:


There are some necessary tweaks needed to get around some of the CSS in columnal.css.

.row {clear: both; width: 100%; max-width: 1140px; margin: 0 auto; overflow: hidden;}

and

.col_1, .col_2, .col_3, .col_4, .col_5, .col_6, .col_7, .col_8, .col_9, .col_10, .col_11 {float: left; margin-right: 3.8%; position: relative; }

The "overflow: hidden" and "position: relative" settings combined will cause the drop-down effect to be hidden by other elements just below the navigation menu.

To compensate, I have made some changes to "custom.css".

#main-navigation
{
background-color:#ffffff;
height:5em;
overflow:visible;/* overrides the overflow:hidden setting in columnal.css */
}

and

#content-text
{
padding:.5em 0 .5em 1em;
position:static;/* overrides the position:relative setting in columnal.css */
}

Now for added spice, I have included a jQuery effect that performs a "fade in" when you hover over the navigation.


Click ((here)) for the project code.

Click ((here)) for an example of the code. 

Thursday, November 15, 2012

Create a Responsive HTML/CSS Skeleton

The best way to learn HTML and CSS is to create a project. This responsive website skeleton I have created will help you understand the basics of positioning, flow and responsiveness, It also can be used as a starting point for any web page design.

Here are the major topics I will cover:

  • Using the Columnal CSS framework.
  • Media queries
  • Using the Chrome debugger

Using the Columnal CSS framework

Many CSS page layout framework exist, but I will be concentrating on just one of them for simplicity. The Columnal Framework divides the page into 12 columns for easy placement. CSS frameworks like this make it easier to create a responsive website. To use it, simply download the CSS file from their web site and use the classes they have set up.

Example:
The class "col_8" will take up 8 vertical columns.

Media queries

CSS media queries enable your website to find out the resolution, pixel density and other important display information about the end user's screen. This information will make it possible to create a user-friendly version of your website.

Using the Chrome debugger

The Google Chrome debugger is probably the best free developer's tool out there. It's fast and simple to use. I will only get into a small subset of it's capabilities for this lesson.

Let's Get Started

 Creating a mock-up in an image editing program such as Photoshop is the first step. I will create two versions. One for a desktop display and one for a mobile display.

Example:


Desktop View


Mobile View


One school of thought states that the smallest mobile version should be coded before the largest desktop version. While you are coding the HTML and CSS for this skeleton, you should continually check your results in Google Chrome. If there is a problem, switch to the Chrome debugging tool by clicking CTRL-SHIFT-I in Windows. Right click on any element in the page and select "Inspect Element" which will highlight the selected element in the "Elements" tab and show the element's styles in the "Style" box to the right. When you hover over the style in the "Style" box, you will notice that a box appears next to the style. You can check this box to turn on and off the style. Also, you can click on the style to edit it. New styles can be added by clicking just below the last style in the class. An insertion box will appear allowing you to type in a style with a value. More information on the Chrome debugger can be found at "Introduction to Chrome Developer Tools, Part One" by Seth Ladd.

When changing the widths of elements on the page, try to stick to the pre-made classes from the Columnal Framework. To include this framework, just visit the Columnal web site and download a copy of the framework.

Use divs with background colors to create horizontal lines since the visibility of the "hr" tag cannot changed.

Create a CSS styles file which has two sections. One for desktop and one for mobile. Setup the mobile version with a CSS media of about 1000 pixels to make it easier to diagnose problems when you are simulating a mobile device screen size on your desktop machine.

Example:

@media only screen and (max-width : 1000px) {
/*CSS styles for mobile version to go here*?
}

The media query can be adjusted later to the true target screen size in the final stages of development.

To make elements appear and disappear by changing the display style. Make sure to keep the design simple to test flow and continue checking the appearance in Chrome.


Click ((here)) for the project code.

Click ((here)) for an example of the code.


Saturday, August 18, 2012

ASP.NET Photo Viewer

This program selects photos based on location, displays a matching photo, caption and date.


To start, create a database and table with the following columns:

Example:

Photos Table
PhotoID - integer
Filename - nvarchar
Caption - nvarchar
Date - nvarchar
Location - nvarchar

Create the necessary labels, radio buttons and image control to display the page.


Add logic to connect to the database.
var dbPath = Server.MapPath("~/App_Data/TravelPhotos.mdb");
oleDbConnection1 = new OleDbConnection();
oleDbConnection1.ConnectionString = "Provider=Microsoft.Jet.OLEDB.4.0; Data Source=" + dbPath;
//Set the path to our image files into a variable for future use (performs this concatenation only once)
string MapPath1 = Server.MapPath("~/App_Data/TravelPhoto.mdb");


Create the variables that will hold the results from the database.
//Two-dimensional Array to hold the info retrieved from the DB
private string[,] m_strTravelInfo;

//Other module level variables
private string m_strFilePath;
private int m_intPhotoCount;
private int m_intCurrentIndex;


Add the logic to handle the check-changed events for the radio buttons.
Stored Procedures:
GetCountOfPhotosByLocation 
SELECT COUNT(*)
FROM Photos
WHERE Location=[@Location];
GetPhotoInfoByLocation
SELECT Filename, Caption, Date
FROM Photos
WHERE Location=[@Location];
protected void rbBigSur_CheckedChanged(object sender, EventArgs e)
{
  //load array
  //diplay first image, caption and date
  GetPhotoData("BigSur");
  //retreive m_intPhotoCount from Session variable
  m_strTravelInfo = (string[,])Session["s_strTravelInfo"];

  string strFileName = m_strTravelInfo[0, 0];
  lblCaption.Text = m_strTravelInfo[0, 1];
  lblTravelDate.Text = m_strTravelInfo[0, 2];
  imgMain.ImageUrl = "~/images/" + strFileName;
}// end rbBigSur_CheckedChanged

private void GetPhotoData(string strLocation)
{
 try
    {
     //Open our connection, provided that it isn't already open
     if (oleDbConnection1.State != ConnectionState.Open)
     {
       oleDbConnection1.Open();
     }
     //Find out how many photos in our DB correspond to the selected location. 
     m_intPhotoCount = GetPhotoCount(strLocation);
     //store m_intPhotoCount in a Session variable
     Session["s_intPhotoCount"] = m_intPhotoCount;
     //Use that value to size our TravelInfo array. 
     if (m_intPhotoCount == 0)
     { //Exit this function if the PhotoCount query returned 0 results
                Console.WriteLine("PhotoCount returned 0 results.  Please investigate.");
      return;
     }
     m_strTravelInfo = new string[m_intPhotoCount, 3];
     //Initialize the location parameter to our GetPhotoInfoByLocation ADO Command Object
     oleDbCommandGetPhotoInfoByLocation = new OleDbCommand("GetPhotoInfoByLocation_sp", oleDbConnection1);
     oleDbCommandGetPhotoInfoByLocation.CommandType = CommandType.StoredProcedure;
     oleDbCommandGetPhotoInfoByLocation.Parameters.Clear();
     oleDbCommandGetPhotoInfoByLocation.Parameters.Add("@Location", OleDbType.VarChar, 25);
     oleDbCommandGetPhotoInfoByLocation.Parameters["@Location"].Value = strLocation;
     //Use a DataReader to get the info from our database
            oleDbDataReader1 = oleDbCommandGetPhotoInfoByLocation.ExecuteReader(CommandBehavior.CloseConnection);
     int intLoopCounter = 0;
     //Loop through this data to populate our TravelInfo array.
     while (oleDbDataReader1.Read() == true)
     {
       m_strTravelInfo[intLoopCounter, 0] = oleDbDataReader1.GetString(0); //Filename
       m_strTravelInfo[intLoopCounter, 1] = oleDbDataReader1.GetString(1); //Caption
       m_strTravelInfo[intLoopCounter, 2] = oleDbDataReader1.GetString(2); //TravelDate
       intLoopCounter++;
      }

      oleDbDataReader1.Close();
      //Display the first photo from our collection matching this location. 
      m_intCurrentIndex = 0;
      //Store m_intCurrentIndex in a Session variable
      Session["s_intCurrentIndex"] = m_intCurrentIndex;
      //store the array in a Session object
      Session["s_strTravelInfo"] = m_strTravelInfo;
      }// end try
      catch (Exception ex)
      {
       Console.WriteLine(ex.Message);
      }
      finally
      { 
       oleDbConnection1.Close();
      }

}// end GetPhotoData


private int GetPhotoCount(string strLocation)
{
  try
  {
   //Set the parameter to allow us to find out how many photos match our selected location. 
   oleDbCommandGetCountOfPhotosByLocation = new OleDbCommand("GetCountOfPhotosByLocation_sp", oleDbConnection1);
   oleDbCommandGetCountOfPhotosByLocation.CommandType = CommandType.StoredProcedure;
   oleDbCommandGetCountOfPhotosByLocation.Parameters.Clear();
   oleDbCommandGetCountOfPhotosByLocation.Parameters.Add("@Location", OleDbType.VarChar, 25);
   oleDbCommandGetCountOfPhotosByLocation.Parameters["@Location"].Value = strLocation;
   //Execute our stored procedure to retrieve the number that we need
   int intNoOfPhotos = Convert.ToInt32(oleDbCommandGetCountOfPhotosByLocation.ExecuteScalar());
   //Send that value back to the calling function
   return intNoOfPhotos;
  }
  catch (Exception ex)
  {
   Console.WriteLine(ex.Message);
   return 0;
  }

}// end GetPhotoCount


Add code to handle the "Previos" and "Next" button click events.
protected void btnNext_Click(object sender, System.EventArgs e)
{
 try
    {
     if (Session["s_intPhotoCount"] != null)
       m_intPhotoCount = (int)Session["s_intPhotoCount"];

     if (m_intPhotoCount == 0)
     { //Exit this function if the PhotoCount query returned 0 results
      lblError.Text = "Please Select an Option Before Clicking on Next";
      lblError.Visible = true;
      return;
     }

     lblError.Visible = false;
     //retreive m_intPhotoCount from Session variable
     m_intPhotoCount = (int)Session["s_intPhotoCount"];
     //retreive m_intCurrentIndex from Session variable
     m_intCurrentIndex = (int)Session["s_intCurrentIndex"];    
            
     if (m_intCurrentIndex < m_intPhotoCount - 1)
     {
      m_intCurrentIndex += 1;
      //Store m_intCurrentIndex in a Session variable
      Session["s_intCurrentIndex"] = m_intCurrentIndex;
      DisplayInfo(m_intCurrentIndex);
     }
     else
     { 
      //Loop around to the other end of our array
      m_intCurrentIndex = 0;
      //Store m_intCurrentIndex in a Session variable
      Session["s_intCurrentIndex"] = m_intCurrentIndex;
      DisplayInfo(m_intCurrentIndex);
     }
   }// end try
   catch (Exception ex)
   {
    Console.WriteLine(ex.Message);
   }
}// btnNext_Click

private void DisplayInfo(int intCounter)
{
 //retreive m_intPhotoCount from Session variable
 m_strTravelInfo = (string[,])Session["s_strTravelInfo"];
 string strFileName = m_strTravelInfo[intCounter, 0];
 lblCaption.Text = m_strTravelInfo[intCounter, 1];
 lblTravelDate.Text = m_strTravelInfo[intCounter, 2];

 if (File.Exists(m_strFilePath + strFileName))
 {
  imgMain.ImageUrl = "~/images/" + strFileName;
 }

}// end DisplayInfo


Click ((here)) for the project code.

Thursday, August 16, 2012

Exchanging Data Between XML and SQL Server With Validation

This post is a continuation of "Exchanging Data Between XML and SQL Server". Here we will add data validation before the data is written to the XML file.

The first thing to do is let Visual Studio generate an XSD (schema) file for you. Double-click on the "books.xml" file in the "Solution Explorer" and click on "XML" at the top menu. Select "Create Schema".


Once the "books.xsd" file has been created, right-click on the "books.xsd" tab and select "Save books.xsd" and choose the current location the "books.xml" is located.


Once this is done, the code to read the XSD file can be done before the XML is processed.


Example
 //*******************test schema******************
 try
    {
      XmlDocument xmld = new XmlDocument();
      xmld.Load(@"C:\Users\ken\Documents\Visual Studio 2010\Projects\XMLtoDatabaseWithValidation\XMLtoDatabaseWithValidation\books.xml");
      xmld.Schemas.Add(null, @"C:\Users\ken\Documents\Visual Studio 2010\Projects\XMLtoDatabaseWithValidation\XMLtoDatabaseWithValidation\books.xsd");
      xmld.Validate(ValidationCallBack);
    }
catch (Exception ex)
    {
      Console.WriteLine("Caught a problem: " + ex.Message);
    }
//******************end test schema***************

private void ValidationCallBack(object sender, ValidationEventArgs e)
{
   Console.WriteLine("There is a problem with the schema or xml document: " + "\n" + e.Message);
            
   throw new Exception();
}


Once this is done, you can try running the XML with no problems and then introduce errors in either the XSD file or XML file to see what happens.

Click ((here)) for the project code.

Exchanging Data Between XML and SQL Server

Here I will convert SQL Server to XML and back from XML to SQL Server. I will be using the "bookstore.xml" file to read and write. I made some modifications to for this example:


Create a Bookstore database. The XML nodes, attributes, sibling nodes and child nodes must be represented in one database record.

Example:

Books Table
RecordID - type int (identity column)
Genre - type varchar
ISBN - type varchar
PublicationDate - type date
Title - type varchar
AuthorFirstName - type varchar
AuthorLastname - type varchar
Price - type int

Create a basic form with 2 buttons with labels to trigger the read and write actions.


Once the Bookstore database has been created with a "books" table, add some sample data to the first row.


Add the "bookstore.xml" file to the project and make a copy of it with the name "bookstore1.xml". Create the code to process the "Write XML to Database" button.

Example:

        private void btnWriteXMLtoDatabase_Click(object sender, EventArgs e)
        {

            // Create an XmlReader
            //using (XmlReader reader = XmlReader.Create(new StringReader(xmlString)))
            using (XmlReader reader = XmlReader.Create(@"C:\Users\ken\Documents\Visual Studio 2010\Projects\XMLtoSQLserver\XMLtoSQLserver\books.xml"))
            {
                reader.ReadToFollowing("book");
                reader.MoveToFirstAttribute();
                strGenre = reader.Value;
                reader.MoveToNextAttribute();
                strPubDate = reader.Value;
                datPubDate = DateTime.Parse(strPubDate); //convert to date format
                reader.MoveToNextAttribute();
                strISBN = reader.Value;
                reader.ReadToFollowing("title");
                strTitle = reader.ReadInnerXml();
                reader.ReadToFollowing("first-name");
                strAuthorFirstName = reader.ReadInnerXml();
                reader.ReadToFollowing("last-name");
                strAuthorLastName = reader.ReadInnerXml();


            }

            //Output to database
            try
            {
                conn.ConnectionString = @"Data Source=KEN-HP\SQLSERVER2008R2;Initial Catalog=Bookstore;Integrated Security=True";
                conn.Open();

                string queryStmt = "INSERT INTO Books(Genre, PublicationDate, ISBN, Title, AuthorFirstName, AuthorLastName)" +
                                    "VALUES(@Genre, @PublicationDate, @ISBN, @Title, @AuthorFirstName, @AuthorLastName)";

                using (SqlCommand _cmd = new SqlCommand(queryStmt, conn))
                {
                    _cmd.Parameters.Add("@Genre", SqlDbType.NVarChar, 50);
                    _cmd.Parameters.Add("@PublicationDate", SqlDbType.DateTime, 50);
                    _cmd.Parameters.Add("@ISBN", SqlDbType.NVarChar, 50);
                    _cmd.Parameters.Add("@Title", SqlDbType.NVarChar, 50);
                    _cmd.Parameters.Add("@AuthorFirstName", SqlDbType.NVarChar, 50);
                    _cmd.Parameters.Add("@AuthorLastName", SqlDbType.NVarChar, 50);
                    _cmd.Parameters["@Genre"].Value = strGenre;
                    _cmd.Parameters["@PublicationDate"].Value = datPubDate;
                    _cmd.Parameters["@ISBN"].Value = strISBN;
                    _cmd.Parameters["@Title"].Value = strTitle;
                    _cmd.Parameters["@AuthorFirstName"].Value = strAuthorFirstName;
                    _cmd.Parameters["@AuthorLastName"].Value = strAuthorLastName;

                    _cmd.ExecuteNonQuery();
                }

            }// end try

            catch (Exception ex)
            {
                MessageBox.Show("Failed to insert to Books Table");
            }
            finally
            {
                conn.Close();
            }

            lblXMLtoDatabase.Visible = true;

        }// end btnWriteXMLtoDatabase_Click


Create code to write from the database to XML.

Example:


        private void btnWriteToXML_Click(object sender, EventArgs e)
        {
            conn.ConnectionString = @"Data Source=KEN-HP\SQLSERVER2008R2;Initial Catalog=Bookstore;Integrated Security=True";


            //********************READ*********************************
            try
            {
                conn.Open();

                SqlCommand command = new SqlCommand(
                    "SELECT * FROM Books;",
                    conn);

                SqlDataReader reader = command.ExecuteReader();


                if (reader.HasRows)
                {
                    while (reader.Read())
                    {
                        strGenre = (string)reader[1];
                        datPubDate = (System.DateTime)reader[2];
                        strPubDate = datPubDate.ToString();
                        strISBN = (string)reader[3];
                        strTitle = (string)reader[4];
                        strAuthorFirstName = (string)reader[5];
                        strAuthorLastName = (string)reader[6];

                        // Open an XML document.
                        System.Xml.XmlDocument myXmlDocument = new System.Xml.XmlDocument();
                        myXmlDocument.Load(@"C:\Users\ken\Documents\Visual Studio 2010\Projects\XMLtoSQLserver\XMLtoSQLserver\books1.xml");
                        System.Xml.XmlNode myXmlNodeFirstBook = myXmlDocument.DocumentElement.FirstChild;

                        // Create a Book element and populate its attributes
                        System.Xml.XmlElement XmlElementMyBook = myXmlDocument.CreateElement("book");
                        XmlElementMyBook.SetAttribute("genre", strGenre);
                        XmlElementMyBook.SetAttribute("publicationdate", strPubDate);
                        XmlElementMyBook.SetAttribute("ISBN", strISBN);
                        // Insert the new element into the XML tree under Catalog
                        myXmlDocument.DocumentElement.InsertBefore(XmlElementMyBook, myXmlNodeFirstBook);

                        // Create a new child of the book element
                        System.Xml.XmlElement myXmlElement2 = myXmlDocument.CreateElement("title");
                        myXmlElement2.InnerText = strTitle;
                        // Insert the new element under the node we created
                        XmlElementMyBook.AppendChild(myXmlElement2);

                        // Create a new child of the book element
                        System.Xml.XmlElement myXmlElement3 = myXmlDocument.CreateElement("author");
                        XmlElementMyBook.AppendChild(myXmlElement3);

                        // Create new child of the author element
                        System.Xml.XmlElement myXmlElement4 = myXmlDocument.CreateElement("first-name");
                        myXmlElement4.InnerText = strAuthorFirstName;
                        myXmlElement3.AppendChild(myXmlElement4);

                        // Create new child of the author element
                        System.Xml.XmlElement myXmlElement5 = myXmlDocument.CreateElement("last-name");
                        myXmlElement5.InnerText = strAuthorLastName;
                        myXmlElement3.AppendChild(myXmlElement5);

                        myXmlDocument.Save(@"C:\Users\ken\Documents\Visual Studio 2010\Projects\XMLtoSQLserver\XMLtoSQLserver\books1.xml");

                    }// end while
                }
                else
                {
                    Console.WriteLine("No rows found");
                }// end if (reader.HasRows)

                reader.Close();

            }// end try

            catch (Exception ex)
            {
                MessageBox.Show("Failed to connect to Books Table");
            }
            finally
            {
                conn.Close();
            }


            //********************END READ******************************

            lblDataWrittenToXML.Visible = true;

        }// end btnWriteToXML_Click

This example is very basic so you will need to manually add , remove and view data from your sample XML files and database.

Click ((here)) for the project code. 


Thursday, August 2, 2012

Create a Basic Quiz Engine for ASP.NET

This is a continuation of "Create a Basic Quiz Engine (part4)".

Here we will convert the WinForm version of the Basic Quiz Engine to an ASP.NET version.

The are some additions and subtractions that are necessary to convert a Winform project to ASP.NET.
The page state must be maintained between page loads. I will use the session object to accomplish this.

Example:
//Creating a session variable
Session["m_strCorrectAnswerDescription"] = strCorrectAnswerDescription;

//................................
//Using the contents of the session variable
strCorrectAnswerDescription = (string)Session["m_strCorrectAnswerDescription"];


 Layout is different with ASP.NET. Positioning of controls is accomplished by changing the "positioning" attribute to "absolute".

Example:

The look and layout of the various controls can be modified by changing their setting in the "Properties Panel" and CSS

Example:


Here is a sample layout for the 2 pages that is similar to the Winform application.


The ASP.NET GridView control is different that the Winform version and must be data bound to a data source. The requires some changes in the .aspx file and .cs file.

Example:

Create the SqlCommand in the questionPage.aspx file and layout the columns you with to appear in the gridView.


Read the UserScore Table usine the SqlDataSource2 to create a gridView in "questionPage.aspx.cs".
dataGridView1.DataBind();


Click here for the project code. Just create a SQL Server database with test data, edit the connection string and run it.