About Me

My photo
Hello, I'm a technology geek looking to upgrade my programming skills. These are some of the things I'm learning along my journey.

Friday, June 29, 2012

FormView Basics in ASP.NET

Create an empty web site with a sample SQL Server database attached. Add a web form to the web site and drag a “formView” control on the new form.

Select the arrow on the right of the "formView" control and select “New Datasource” in the dropdown menu by “Choose Datasource... “.


Choose “SQL Database” and click “OK”.


Choose the name of the database you created from the dropdown menu and click “Next”.


Make sure “Yes” is checked in the check box and a connection string name has been filled in and click “Next”.


Accept the defaults and click “Advanced”.


Check “Generate Update, Insert and Delete Statements”. Check “Use optimistic concurrency”. Click “OK”. Click “Next”.


Click “Test Query”. Click “Finished”.  


Click on "AutoFormat" from the "FormView Tasks" flyout menu.


Select a format that looks pleasing to you and click "OK".

 
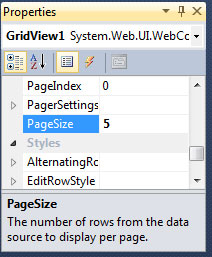
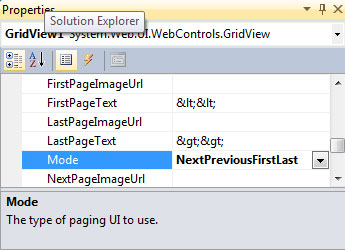
Click on "Enable Paging" in the flyout menu.


Press F5 to start the debugging session to see if your "formView" shows in the browser with the data from your database.


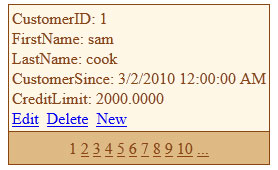
Click on "edit" to change to edit mode and see how the format changes to the default template. The "AutoFormat" feature only covers the initial view.


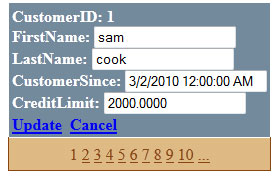
To change the other "Item Templates", click on "Edit Templates" from the flyout menu.


Here you can select the "Item Template" you wish to modify by selecting the "Item Template" in the dropdown menu.


To modify a template, select the text or box in the preview and select a desired control from the "Formatting" toolbar at the top. It the "Formatting" toolbar is not visible, click on "View", hover over "Toolbars" and select "Formatting". Click on "End Editing" when done.


You can download the complete program here.

Thursday, June 28, 2012

GridView Features in ASP.NET (Part 2)

Start this lesson with the code from GridView Features in ASP.NET (Part 1)

Select "Edit Columns".


Select "FirstName" in the "Selected Fields". Change the "Header Text" in "BoundField Properties" from "FirstName" to "First Name". Many other changes can be made as well to each field. Play around with menu for yourself and click "OK".

Select "Enable Editing".


Try this out by pressing F5. Click on "Edit" for one of the rows and make a change and click "Update".

Select "Enable Deleting" and try it out too.

Download the code to this lesson here.


GridView Features in ASP.NET (Part 1)

Create an empty web site with a sample SQL Server database attached. Add a web form to the web site and drag a “gridView” control on the new form.

Select the arrow on the right of the GridView control and select “New Datasource” in the dropdown menu by “Choose Datasource... “.


Choose “SQL Database” and click “OK”.


Choose the name of the database you created from the dropdown menu and click “Next”.


Make sure “Yes” is checked in the check box and a connection string name has been filled in and click “Next”.


Accept the defaults and click “Advanced”.


Check “Generate Update, Insert and Delete Statements”. Check “Use optimistic concurrency”. Click “OK”. Click “Next”.


Click “Test Query”. Click “Finished”.


Enable paging by clicking on checkbox labeled “Paging”


Enter 5 in the “PageSize” property of your gridView control.


Press F5 to start the debugging session to see if your gridView shows in the browser with the data from your database. Assuming that you have more than 5 rows in your database, you should notice that there are page number links at the bottom of your gridView control.


You can change the “PagerSetting” for your gridView properties to enable non-numeric page navigation in the “Mode” property.


The text of the previous, next, first and last can be changed from HTML codes to plain text.


Enable sorting by clicking on checkbox labeled “Sorting”.


Press F5 to start the debugging session to see that the first row of your gridView has the titles underlined. Click on the underlined text to sort the rows in either ascending or descending.

You can download the complete program here.


Tuesday, June 26, 2012

Introduction to the GridView Control in ASP.NET

Create a new web site in Visual Studio. Create a new database in Visual Studio. Right click on the web site name in the “Solution Explorer” and select “Add New Item...”. Select “Web Form” and click “Add”.


Make sure the web form that you just created is selected and is in “Design” view. Select the “Toolbox” on the left and drag a new “GridView”control from the “data section” on the the new web form.


Select the arrow on the right of the GridView control and select “New Datasource” in the dropdown menu by “Choose Datasource... “.


Choose “SQL Database” and click “OK”.


Choose the name of the database you created from the dropdown menu and click “Next”.


Make sure “Yes” is checked in the check box and a connection string name has been filled in and click “Next”.


Accept the defaults and click “Next”.


Click “Test Query” to see if the query is successful and then click “Finished”.


Press F5 to start the debugging session to see if the GridView shows in the browser with the data from your database.


Create a Database in Visual Studio

Create a new empty web site in Visual Studio by clicking on “File” ,selecting “New Web Site” and selecting “ASP.NET Empty Web Site” in the dialog box. Choose your preferred language in the upper left of the dialog box and create an appropriate name for your new web site. Click “OK”.


Make sure the “Server Explorer” or the “Database Explorer” is visible on the right hand side of the screen. If not, click on the “View” menu and select either “Server Explorer” or “Database Explorer”.

Make sure the “Solution Explorer” is visible on the right side by selecting the “Solution Explorer” tab and right click on the web site name. A menu should appear and select “Add new item...”. Scroll down the dialog box and select “SQL Server Database” and click “Add”. A message box will appear asking you to place the file in a separate “App_Data” folder. Click “Yes”. The new database should appear in the “Server Explorer” or “Database Explorer”.


Right click on “Tables” and select “Add New Table”. Create database column entries by filling in “Column Name”, “Data Type” and “Allow Nulls”. When finished, click “Save”. Choose a table name in the pop-up window and click “OK”.


Right click on the new table name in the “Server/Database Explorer” and select “Show Table Data”. Fill in appropriate sample data for each column created and you are done.


Sunday, June 24, 2012

Creating and Storing Profiles in ASP.NET - Simplified

A good web site will remember the visitor even he/she does not log in to the site. There are lots of possible things to remember such as color scheme, shipping address, etc. The visitor is more likely to return in the future when personal preferences are stored and retrieved upon revisiting.

Let me start with a very basic example so you can get the picture without the clutter.

Start a new blank web site in Visual Studio 2010. Click on "Website" on top of screen. Select "ASP.NET configuration". Click on the "Security" tab. Under "Users" click on "Select Authentication Type".Select "From the Internet". Click on "Done". Under "Users" click on "Create user". Fill in "Create User" boxes and click "Create User". Click on "Back". Close browser program. Close VS 2010. Reopen VS 2010. The “App_Data” folder should be visible in the "Solution Explorer" with the "ASPNETDB.MDF" file in the folder. The “Database Explorer” should have the "ASPNETDB.MDF" file. Open up the "ASPNETDB.MDF" file in the "Database Explorer".
Open the "Tables" folder to find the "aspnet_Profile" table. Right click on the "aspnet_Profile" table and select "Show Table Data". All the cells should be null. In summary, Visual Studio has autogenerated a SQL Server database with the necessary table, fields and stored procedures to make it easy for you to work with profiles.

Click to enlarge: 


Modify the “web.config” file to accept anonymous users:


Add four properties in the “profile” section with the anonymous attribute set to true:
example:


Add some text boxes, labels and drop down controls to test your program.

Click to enlarge.


Initial the text controls with the existing entries in the Profile table.
example:
if (Profile.Name != "")
           {
               LabelName.Text = Profile.Name;
               LabelName.Visible = true;
               lblWelcome.Visible = true;
           }
           if (Profile.Age != 0)
           {
               LabelAge.Text = Profile.Age.ToString();
               LabelAge.Visible = true;
               lblAge.Visible = true;
           }
           if (Profile.City != "")
           {
               LabelCity.Text = Profile.City;
               LabelCity.Visible = true;
               lblCity.Visible = true;
           }
Create an event handlers for your submit button, drop-down list, etc.
example:
protected void SubmitButton_Click(object sender, EventArgs e)
    {
       Profile.Name = TextBoxName.Text;
       Profile.Age = Int16.Parse(TextBoxAge.Text);
       Profile.City = TextBoxCity.Text;
       LabelName.Text = Profile.Name;
       LabelName.Visible = true;
       lblWelcome.Visible = true;
       LabelAge.Text = Profile.Age.ToString();
       LabelAge.Visible = true;
       lblAge.Visible = true;
       LabelCity.Text = Profile.City;
       lblCity.Visible = true;
       LabelCity.Visible = true;
       Profile.Color = "none";
       lblColorSelectionText.Visible = true;
       cboColor.Visible = true;
       
    }
protected void cboColor_SelectedIndexChanged(object sender, EventArgs e)
    {
       lblColorText.Visible = true;
       switch (cboColor.SelectedItem.ToString())
       {
           case "red":
               lblColor.Visible = true;
               Profile.Color = "Red";
               lblColor.Text = Profile.Color;
               break;
           case "blue":
               lblColor.Visible = true;
               Profile.Color = "Blue";
               lblColor.Text = Profile.Color;
               break;
           case "green":
               lblColor.Visible = true;
               Profile.Color = "Green";
               lblColor.Text = Profile.Color;
               break;
       }
You can store objects of any type using profiles. The profile feature provides a generic storage feature that allows you to define and maintain almost any kind of data while still making the data available in a type-safe manner which means your intellisense works. This is in contrast to the session object which doesn’t have this advantage.

Now run the program and check the table data of the "aspnet_Profile" table. You should see entries in the “PropertyNames” and “PropertyValuesString” fields.

If you run the program a second time with different profile data, you see that the first row in the "aspnet_Profile" table has been overwritten. The reason for this is that you are the same user to the ASP.NET server so it doesn’t add a new row for you. If you want to simulate a different user, just copy the web address at the top of the browser and open a different browser with the copied address pasted new browser. Example: You started your program for the first time in Firefox. Start the program for the second time in “Chrome”. Once you do this the table should have a second row with data written to it.

You can download the complete program here.

Click here for a more thorough explanation of profiles.

Thursday, June 14, 2012

Working with the Global.asax file

The Global.asax is an optional file that contains code to handle global events in your ASP.NET web site. It has handlers for the application and session object.

Code to handle application events (such as the start and end of an application) resides in Global.asax. Such event code cannot reside in the ASP.NET page or web service code itself, since during the start or end of the application, its code has not yet been loaded (or unloaded). Global.asax is also used to declare data that is available across different application requests or across different browser sessions. This process is known as application and session state management.

The application object is created when the first request by the user is made and is global across all users and all web visitors. It is removed from memory after inactivity or shut down by web server.

A session object is created when the first page request is made by each user. It is global across all web pages and unique for each user. It is removed from memory after a specified length of time when the user is inactive.

To illustrate, I will demonstrate a simple example that will track current number of users that are working with a web site.

1. Create an empty ASP.NET web site in Visual Studio.
2. Click on “Website” at the top of the menu and select “Add New Item”.
3. Choose “Global Application Class” from the dialog box and click “OK”.


Click to enlarge

4. The application object and session objects both have an internally managed collection to enable you to add some values. To start off let’s add a “userCount” variable and initialize it to zero in the “Application_Start” event handler.

example code:
void Application_Start(object sender, EventArgs e)
    {
       Application.Add("userCount", 0);
    }
5. The next step is to increment and set the “userCount” whenever a new visitor comes to the web site. This is done in the “Session_Start” event handler.

example code:
void Session_Start(object sender, EventArgs e)
    {
       int userCount = int.Parse(Application.Get("userCount").ToString());
       userCount++;
       Application.Set("userCount", userCount);
    }
6. Once the user leave the web site the “userCount” field must be de-incremented.
This is done in the “Session_End” event handler.


example code:
void Session_End(object sender, EventArgs e)
    {
       int userCount = int.Parse(Application.Get("userCount").ToString());
       userCount--;
       Application.Set("userCount", userCount);
    }
7. The only thing left to do is to display the “userCount” on the web page. Create a “default.aspx” page in your project and enter the following in the “Page_Load” method of the “default.aspx.cs”.


example code:
    protected void Page_Load(object sender, EventArgs e)
    {
       Page.Response.Write("UserCount: " + Application.Get("userCount").ToString());
    }
8. Now you are ready to test your changes. Start a dubugging session by pressing F5. Your default browser should come up and the text “UserCount: 1” should show at the top of the page. To increment the “userCount”, copy the web address at the top of the browser and open a second browser on your machine. The “userCount” should now be 2. If you wait a while (typically 20 minutes), the session will expire and the “userCount” will de-increment after the browser is refreshed.

Download the complete code to this project >>here<<.