
The first part will go into the recreation of the graphics so that you can adjust it to your needs. The code and graphics from Professional Dropdown #2 will be used for this exercise. I will show how to simulate the effect of these images in Photoshop and change the colors in the graphics from the existing shade of green to the same shade of in blue.
The existing graphics for this example are:
 | ||
| three_0.gif |
 | |||
| three_0a.gif |
 | |
| three_1.gif |
 | |
| three_1a.gif |
The second graphic on the list is "three_0a.gif" which is a basic glossy button with a small white triangle. The size is 300px wide by 35px high. The graphic "three_0.gif" is a slice of "three_0a.gif" and can be created in the same artwork. The same for "three_1.gif" and "three_1a.gif".
Step 1:
Create an new file in Photoshop with the dimensions of 600px wide by 70px high which is double the size of the original graphic. It's easier to start with a large file to fill up the screen
and reduce the size later to the required dimensions.

Step 2:
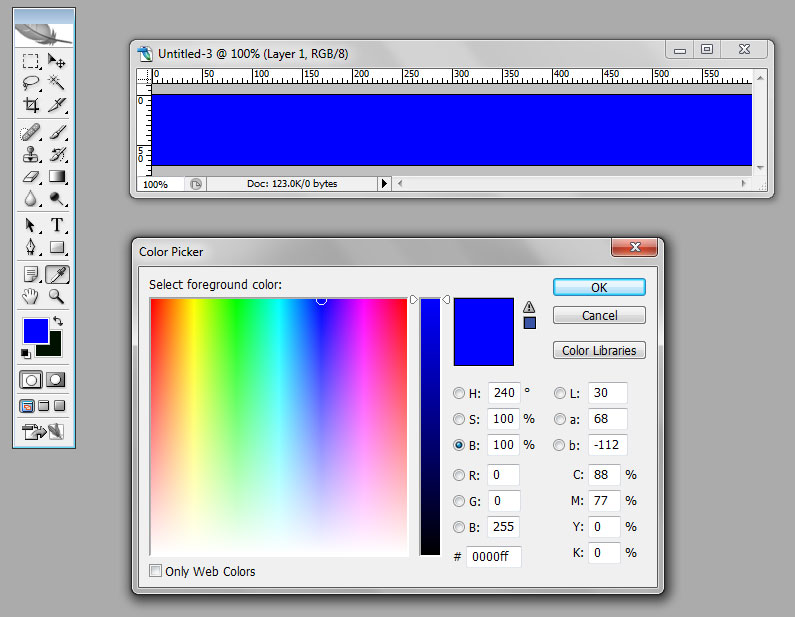
Set the foreground color by clicking on the color swatch and choosing a blue "#0000ff" in the "Color Picker". With the top layer highlighted, click "Edit", "Fill...", choose "Foreground Color" and click "OK".
Step 3:
Switch the the foreground color by pressing the "x" key and click on the foreground color to bring up the "Color Picker". Choose a white color "#ffffff and click "OK". Create a gradient overlay on top of the layer by clicking "Layer", "Layer Style", "Gradient Overlay...". With the "Gradient Overlay" selection of the "Layer Style" selected, click on the gradient dropdown menu. This will bring up the "Gradient Editor" Adjust the gradient to your liking and click "OK". To get a more detailed tutorial on creating a gradient with the editor, ((click here)).

Step 4:
Add an arrow to the image by clicking on "Layer", "New", "Layer". Right click on the layer and select "Layer Properties". In the name box type "arrow" and click "OK". Click and hold the "Rectangle Tool" (U) and select the "Polygon Tool". Type "3" in the "Sides" box at the top. Set the foreground color to white or a color that will stand out. While holding down the shift key, draw a triangle at the top of the image. Choose the "Move Tool" (V) and position it to the desired location.

Step 5:
Resize the image by clicking on "Image", "Image Size...". Type 300 pixels for the width and 35 pixels for the height and click "OK". Click on "File" and then "Save for Web...". Choose "GIF 128 no Dither", check "Transparency" and click "Save". Choose the name "blue_0a.gif" and the folder where the original graphics are located.
Step 6:
Crop and small slice of the image to create the "blue_0.gif" by selecting the "Crop Tool" (C) and dragging it over a small section of the image. Click on "File" and then "Save for Web...". Choose "GIF 128 no Dither", check "Transparency" and click "Save". Choose the name "blue_0.gif" and the folder where the original graphics are located.
Step 7:
Reverse the previous crop in step 6 to bring the image back to it's original dimensions by pressing CTL-Z or stepping back one step in the "History" tab. Highlight the "Layer 1" layer. Click on "Image", "Adjustments" and "Brightness/Contrast...". Increase the contrast to 30 and click "OK".

Step 8:
Highlight the "Layer 1" layer. Click on "Layer", "Layer Style", "Bevel and Emboss...". Leave the settings on their defaults except Style: Inner Bevel, Direction: Down, Size: 3px.

Step 9:
Click on "File" and then "Save for Web...". Choose "GIF 128 no Dither", check "Transparency" and click "Save". Choose the name "blue_1a.gif" and the folder where the original graphics are located.
Turn off the "arrow" layer visibility and click on "File" and then "Save for Web...". Choose "GIF 128 no Dither", check "Transparency" and click "Save". Choose the name "blue_1.gif" and the folder where the original graphics are located.

No comments:
Post a Comment